1.1 Scope Development Process
Scope development is the process of describing, in sufficient detail, the turnaround’s deliverables and the work required to accomplish those deliverables. All scope items should have at least one, direct connection to the turnaround business objectives.
Scope Development Life Cycle

1.1.1 Scope Categories
Prior to developing scope, there needs to be a structure in place to group the different jobs into categories. These categories are generally broke down based off of the turnaround’s business objectives.
Sample Categories
Tiers – Categorize the scope into business objectives categories.
- Tier 1 – Safety, Environmental, Regulatory, Mechanical Integrity Items That Require a Turnaround to Execute
- Tier 2 – Items Requiring A Shutdown That Are Necessary To Ensure an Uninterrupted Run Until The Next Scheduled Turnaround
- Tier 3 – Reliability Items Required To Achieve A 97% Operational Efficiency Rating With No Unplanned Outages Until The Next Scheduled Turnaround, These Items Also Require A Turnaround To Execute
- Tier 4 – Additional Items That Could Increase Efficiency or Productivity That Are Justified On A Return On Investment Basis, These Items Also Require A Turnaround To Execute
Drivers – Further define the scope within the Tier it is associated with.
- Regulatory Compliance
- Required By Inspections
- Environmental, Health & Safety
- VOC Emissions
- Reliability, Availability, Maintainability
- Opportunity Requires Turnaround
- Other Work Scope Requiring Turnaround
- Capital Projects / Improvements
1.1.2 Typical Turnaround Scope Items
- Malfunctioning Equipment
- Any equipment that will be at or near failure at the time of the turnaround
- Equipment needing repairs that cannot be performed online
- Leaking valves
- Inoperable valves
- PSV’s due for inspection
- Equipment due for inspection
- Equipment needing to be cleaned due to fouling
- Any containment items such as clamps
- VOC leaks
- Regulatory Compliance Items
Preliminary Work List
The development of the preliminary work list is the first stage in the scope development life cycle. It starts by collecting all known turnaround related items; these will come in the form of different lists from different parts of the organization. For example:
- Any items required to meet business objectives in the turnaround premise document
- Capital Project items
- Regulatory compliance items
- CMMS backlog
- Reliability items required to meet the units desired run cycle Repairs that require turnaround to execute
- PM’s
- Piping Tie-Ins
- VOC Emissions
Once the lists have been collected, they need to be consolidated in the turnaround work log. The work log could be in the form of an Excel document or a computerized planning database. The work log should contain the appropriate amount of information to effectively manage the scope.
Sample fields to include in the work log:
With the different scope lists consolidated, there should be scope development meetings to review each item individually to ensure all needed information has been identified. It’s recommended to obtain a copy of the latest version of the P&ID’s and mark up each item as they are reviewed to prevent duplicating scope items. Often, different operators or maintenance personnel enter the same items in the CMMS software with different descriptions. By marking the scope items up on the P&ID’s, it prevents planning duplicate work, thus saving you time and money.
1.1.3 Risk-Based Work Selection
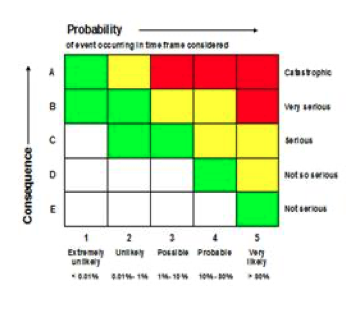
Scope is developed utilizing a risk matrix to identify the probability and consequence of doing, or not doing, a specific item in relation to the turnaround’s business objectives. The matrix is made
up of a 5 X 5 scale with the horizontal axis representing the probability and the vertical axis representing the consequence. The probability ranges from 1 thru 5, with 1 representing the least likely to occur and 5 being the most likely to occur. The consequence ranges from A through E, with A being the most severe and E being the least severe.
Sample Risk Matrix
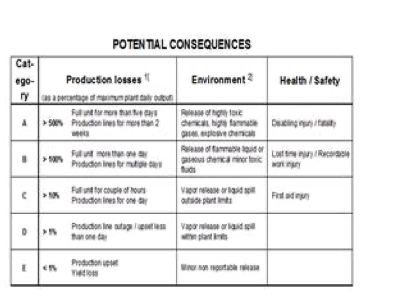
Sample Consequences
Utilizing (RBWS) Risk Based Work Selection provides a foundation for the organization to make decisions on whether a particular scope item should be included in the turnaround’s scope. Utilizing this process will help eliminate unnecessary scope items that could impact your overall budget and duration.