Jun 19, 2020 | Training Course Outlines
Print Outline
- Developing a Good Schedule
- Schedule Lifecycle – Management Expectations
- Primavera Reports
- Manpower
- Critical Path / Critical Mass
- Earned vs. Planned compared to Actual o Schedule Updates
- Change Management
- Key Trigger Points to Ensure Good Schedule Development
- Integrated Reporting
- Reading Reports
This course allows managers and project team members to execute work utilizing the Primavera software.
Jun 19, 2020 | Training Course Outlines
Print Outline
Course Topics
Session 01: User and Admin Preferences
- Review and adjust specific user and admin preferences to provide an in-depth understanding of how they can affect scheduling
Session 02: Duration and Percent Complete Types
- Hands on review of how activity Duration Type affects schedule calculations
- Hands on review of how activity Percent Complete Type affects schedule calculations, specifically around earned value reporting
- Review common default project settings
Session 03: Utilizing P6 Cost Accounts
- Cost Accounts Relationship to Earned Value Reporting
- Example Utilizing All Earned Value Components
- Cost Account Structure in P6
- Create a Cost Account Structure
- Assigning Cost Accounts to activity Resource Assignments or Expense Assignments
Session 04: Importing and Exporting
- P6 XER file import and Export
- Excel Import and Export
- Exporting and Importing Layouts and Reports
Session 05: Utilizing Cost
- Understand how the Resource Type affects units, cost, and earned value field calculations
- Apply hourly rates to labor, non-labor, and material resources
- Add expense items with cost
- View the overall costs for a P6 project file
Session 06: Allocating Resources
- Setting Up the Resource Assignments View Layout
- Apply Budgets and Assign Cost Accounts in the Assignments View
- Changing Resources on Assignments
Session 07: Resource Leveling
- Leveling Concepts
- P6 Leveling Settings
- Activity Leveling Priorities
- Creating Shift Calendars
- Setting the Resource Limits (Max Units/Time)
- Adjust Resource Limits (Max Units/Time)
- View and Print a Resource Profile Summary
Session 08: Advanced Scheduling Concepts
- Adding Contingency to a Schedule
- Retained Logic and Progress Override
- Calendar Effect on Relationship Lag Assignments
- Calculating Multiple Float Paths
Session 09: User Defined Fields and Global Change
- Define and Create User Defined Fields
- Understanding the Global Change Functionality
- Create and Apply a Global Changes
Session 10: Change Control and Baseline Updates
- Use a P6 Staging Project for Pending Changes
- Performing “What-If” Schedule Analysis
- Apply Approved Changes to a Project
- Baseline Updates with Schedule Changes
Session 11: Reflection Projects
- Understand Reflection Projects
- The Common uses for Reflection Projects
- Create, Edit, and Merge a Reflection Project
Jun 19, 2020 | Training Course Outlines
Print Outline
Course Topics
Session 01: Introduction
- The Turnaround Terminology and Process
- Where the schedule fits in the big scheme
- Values of Schedule
- The Primavera Technical Structure
- The Hierarchical Structure of P6 Data Session 02: User and Admin Preferences
- Understand how user preferences work
- Set up and establish user preferences for a turnaround scheduling
- Review and modify specific admin preferences
Session 03: Basic Navigation
- The P6 toolbars and menus
- The structure of typical P6 layouts (views)
- How to edit toolbars
- Saving and opening layouts
- P6 hot keys
Session 04: Creating the EPS
- How the EPS is utilized in the Primavera software
- How to create the EPS and the thought process behind it
Session 05: Creating a P6 Project
- Use the wizard to create a project, identifying the initial attributes
- Discuss and modify certain project settings and make critical adjustments before beginning project development
- Define the default settings for new activities
- Review the different activity duration types and how each calculate
- Review the activity percent complete types and how they affect earned value reporting
- Define other project settings typical for turnaround scheduling
Session 06: The P6 Work Breakdown Structure
- Identify a standard Turnaround Work Breakdown Structure (WBS)
- Fully utilize all (WBS) capabilities in the details view to make the schedule more user friendly for reporting, updating, and managing turnaround equipment plans/job plans
- Understand the concept of utilizing the WBS for moving data from historic or template projects into a new turnaround project file
- Build a WBS
Session 07: Creating Calendars
- Identify the three different types of calendars
- View and Edit Calendars
Session 08: Adding and Configuring Activities
- Add an activity using the New Activity Wizard
- Review the different activity types
- Utilize a template to add Job Plans
- Perform a simple Global Change
- Use the Replace and Re-number Activities Functionality
- Use an Excel Template to Import Activity Data
- Understand the Different Relationship Types
- Add Activity Relationships utilizing different techniques
- Understand and apply Relationship Lag
- Understand Constraint Types and apply Constraints
Session 09: Scheduling
- Understand Critical Path Method (CPM Scheduling)
- Understand the Data Date
- Understand Total Float and Free Float
- Resolve Circular Relationships
- Identify Open Ends
- Review the Schedule Log
Session 10: Activity Codes
- Understand the difference between Global, EPS, and Project activity codes
- Understand unique Coding ID’s for Primavera at an Enterprise level
- Build activity codes structures with smart code values
- Create a Code Assignment Layout
- Assign activity codes utilizing multiple techniques
Session 11: Customizing Layouts
- Group and Sort activities
- Understand how to build and save a layout
- Utilize filters in layouts
- Edit appearances of fonts, row heights, and bars
- Import and Export Layouts
Session 12: Creating and Assigning Resources
- Understand the fully resource loaded schedule
- Understand P6 resources and attributes
- Create a turnaround specific resource pool
- Understand different techniques for assigning resources to activities
- Review Resource Profiles
Session 13: Optimizing the Project Plan
- Analyze schedule dates
- Analyze Critical Activities
- Shorten a project schedule
- Analyze resource allocation
Session 14: Baselining the Project Plan
- Understand what a baseline is
- Understand the purpose for two baselines in turnaround scheduling
- Create a baseline and maintain that baseline against the existing project
- Edit and show the baseline bars in the Gantt chart
- Conduct baseline variance reporting
- Restore a Baseline
- Convert a Restored Baseline Back to the Baseline of the Current Schedule
Session 15: Project Execution and Control
- Understand the Update Process and Required Reports
- Build a status entry layout
- Perform activity updates utilizing multiple techniques
- Advance the Data Date
- Resolve actual start and finish dates ahead of the data date
- Understand Retained Logic and Progress Override Schedule Options
Session 16: P6 Reporting
- Understand the Reports Window
- Create a Report
- Run existing reports and review the output options
- Preview additional functionality in the P6 Report Editor
Jun 19, 2020 | Training Course Outlines
Print Outline
Course Topics
Session 01: Introduction
- The Turnaround Terminology and Process
- Where the schedule fits in the big scheme
- Values of Schedule
- The Primavera Technical Structure
- The Hierarchical Structure of P6
Data Session 02: User and Admin Preferences
- Understand how user preferences work
- Set up and establish user preferences for a turnaround scheduling
- Review and modify specific admin preferences
Session 03: Basic Navigation
- The P6 toolbars and menus
- The structure of typical P6 layouts (views)
- How to edit toolbars
- Saving and opening layouts
- P6 hot keys
Session 04: Creating the EPS
- How the EPS is utilized in the Primavera software
- How to create the EPS and the thought process behind it
Session 05: Creating a P6 Project
- Use the wizard to create a project, identifying the initial attributes
- Discuss and modify certain project settings and make critical adjustments before beginning project development
- Define the default settings for new activities
- Review the different activity duration types and how each calculate
- Review the activity percent complete types and how they affect earned value reporting
- Define other project settings typical for turnaround scheduling
Session 06: The P6 Work Breakdown Structure
- Identify a standard Turnaround Work Breakdown Structure (WBS)
- Fully utilize all (WBS) capabilities in the details view to make the schedule more user friendly for reporting, updating, and managing turnaround equipment plans/job plans
- Understand the concept of utilizing the WBS for moving data from historic or template projects into a new turnaround project file
- Build a WBS
Session 07: Creating Calendars
- Identify the three different types of calendars
- View and Edit Calendars
Session 08: Adding and Configuring Activities
- Add an activity using the New Activity Wizard
- Review the different activity types
- Utilize a template to add Job Plans
- Perform a simple Global Change
- Use the Replace and Re-number Activities Functionality
- Use an Excel Template to Import Activity Data
- Understand the Different Relationship Types
- Add Activity Relationships utilizing different techniques
- Understand and apply Relationship Lag
- Understand Constraint Types and apply Constraints
Session 09: Scheduling
- Understand Critical Path Method (CPM Scheduling)
- Understand the Data Date
- Understand Total Float and Free Float
- Resolve Circular Relationships
- Identify Open Ends
- Review the Schedule Log
Session 10: Activity Codes
- Understand the difference between Global, EPS, and Project activity codes
- Understand unique Coding ID’s for Primavera at an Enterprise level
- Build activity codes structures with smart code values
- Create a Code Assignment Layout
- Assign activity codes utilizing multiple techniques
Session 11: Customizing Layouts
- Group and Sort activities
- Understand how to build and save a layout
- Utilize filters in layouts
- Edit appearances of fonts, row heights, and bars
- Import and Export Layouts
Session 12: Creating and Assigning Resources
- Understand the fully resource loaded schedule
- Understand P6 resources and attributes
- Create a turnaround specific resource pool
- Understand different techniques for assigning resources to activities
- Review Resource Profiles
Session 13: Optimizing the Project Plan
- Analyze schedule dates
- Analyze Critical Activities
- Shorten a project schedule
- Analyze resource allocation
Session 14: Baselining the Project Plan
- Understand what a baseline is
- Understand the purpose for two baselines in turnaround scheduling
- Create a baseline and maintain that baseline against the existing project
- Edit and show the baseline bars in the Gantt chart
- Conduct baseline variance reporting
- Restore a Baseline
- Convert a Restored Baseline Back to the Baseline of the Current Schedule
Session 15: Project Execution and Control
- Understand the Update Process and Required Reports
- Build a status entry layout
- Perform activity updates utilizing multiple techniques
- Advance the Data Date
- Resolve actual start and finish dates ahead of the data date
- Understand Retained Logic and Progress Override Schedule Options
Session 16: P6 Reporting
- Understand the Reports Window
- Create a Report
- Run existing reports and review the output options
- Preview additional functionality in the P6 Report Editor
Jun 18, 2020 | Training Course Outlines
Print Outline
Day 1
- Understanding Scheduling Concept
- Create Enterprise Project Structures (EPS)
- Create a Project
- Set up User Preferences
- Create a Work Breakdown Structure (WBS)
- Create Calendars
Day 2
- Add Activities
- Schedule the Project
- Create Activity Codes
- Customize the Project
- Roles and Resources
Day 3
- Optimize the Project Plan
- Baseline Management
- Project Execution and Control
- Reporting
At the completion of this course the student will be able to:
- Create a Project
- Set Up User Preferences
- Create Calendars
- Import/Export Activities
- Create relationships
- Create and Assign Activity Codes
- Filter, group, and Sort Activities
- Create Custom Layouts
- Assign and Analyze Roles and Resources
- Maintain and Assign Baselines
- Update and Status the Project
- Produce Reports
Jun 18, 2020 | Training Course Outlines
Print Outline
Night 1
- Introductions
- Preparation for Planning at a New Site
- Understanding Work Scope Development
- Prepare Walk Down Document Needs (P&ID, Isometrics, ITP, Blind List)
- Utilize Onsite Training Unit and Perform Job Walk Downs
- Complete Work Package Data Markups (P&ID’s, Plot Plans, Picture Templates)
Night 2
- Introduction to Planning Programs
- Introduction to Planning Templates
- Coding of Activities
- Use of Estimating Toolbox for Durations and Man Hour Entries
- Accurate BOM Creation
- Attaching Data to the Job Plan
- Data Warehousing and Data Mining of Solid Work Plans
Night 3
- Assignment of Jobs for Planning
- Perform Job Walk Down Per Scope or Work List
- Work Package Data Markups (P&ID’s, Plot Plans, Picture Templates)
- Create Complete Detailed Job Plan Using the Materials and Tools Provided
- Understanding and Performing Job Plan Validations
Night 4
- Finalize Plan Validations
- Your Plan is Off to The Schedule and What That Means
- A Visit with The Schedulers
- Staffing, Budgeting, Material Requisitioning, Contractor Validations, and Execution
- A Visit with The Cost Department
At the completion of this course the student will be able to:
- Apply Learned Planning Processes In A Real World Environment
- Understand Planning Processes From Scope Development To Schedule Importing
- Obtain 20 PDU’s (Professional Development Units) to PMI (Project Management Institute)
- Create Turnaround, Maintenance and Project Plans With Confidence

Jun 15, 2020 | Documentation
Plan Validation – Creating Ownership
The purpose of plan validation is to create ownership in the plan within the organization. Plan validation establishes the mentality that the job plan is “our plan” instead of “your plan”. Another function the plan validation serves is to vet the plan prior to being added to the schedule. Often times this does not happen and causes serious delays in schedule development. Ideally, the plans should go through the proper validation during the planning phase so that when the job is entered in the schedule, the focus can be on tying logic and optimization.
Plan Validation Responsibilities

Plan Validation Work Flow

Lead Planner Validation
The lead planner is the first checkpoint in the validation process; he has the most responsibility of any participant involved. He is responsible for validating all aspects of the work package. He reviews the activities and their role assignments, durations and sequence. The lead planner also assures the scope, documentation, material, and specifications are correct.
Internal Team Validation
The internal team validation is the second checkpoint in the validation process. The team is generally made up of representatives from operations, reliability, safety, and inspections. When internal team validation is complete, the job can be added to the turnaround schedule. Below are some examples of the responsibilities each person has on the internal team:
- Inspections representative – validates that all required inspection activities, safety requirements, and material specifications have been included in the work package and the sequencing is correct.
- Operations representative – validates that all safety requirements, activities, and their sequencing are correct.
- Reliability representative – validates that all safety requirements, drawings, material specifications, inspections activities, and their sequencing are correct.
- Safety representative – validates that all safety requirements, activities, and their sequencing are correct.
Contractor Validation
Contractor validation is the final checkpoint in the validation process. Core individuals from each contractor should be brought in early to allow sufficient time to validate all jobs prior to the execution of pre-turnaround activities. Any contractor with direct field labor work should validate that all activities have been captured as well as assure their durations, roles, and sequencing are correct.
There will be discrepancies during the validation process; when this happens, it needs to be reviewed with the lead planner to determine the correct course of action. If the discrepancy is legitimate, the corrections should be made and communicated to the scheduler to make the changes in the schedule. Contractor validation is a critical piece to a successful turnaround. It directly affects the development of a quality turnaround schedule and a sound budget.

Jun 15, 2020 | Documentation
1.1 Scope Development Process
Scope development is the process of describing, in sufficient detail, the turnaround’s deliverables and the work required to accomplish those deliverables. All scope items should have at least one, direct connection to the turnaround business objectives.
Scope Development Life Cycle

1.1.1 Scope Categories
Prior to developing scope, there needs to be a structure in place to group the different jobs into categories. These categories are generally broke down based off of the turnaround’s business objectives.
Sample Categories
Tiers – Categorize the scope into business objectives categories.
- Tier 1 – Safety, Environmental, Regulatory, Mechanical Integrity Items That Require a Turnaround to Execute
- Tier 2 – Items Requiring A Shutdown That Are Necessary To Ensure an Uninterrupted Run Until The Next Scheduled Turnaround
- Tier 3 – Reliability Items Required To Achieve A 97% Operational Efficiency Rating With No Unplanned Outages Until The Next Scheduled Turnaround, These Items Also Require A Turnaround To Execute
- Tier 4 – Additional Items That Could Increase Efficiency or Productivity That Are Justified On A Return On Investment Basis, These Items Also Require A Turnaround To Execute
Drivers – Further define the scope within the Tier it is associated with.
- Regulatory Compliance
- Required By Inspections
- Environmental, Health & Safety
- VOC Emissions
- Reliability, Availability, Maintainability
- Opportunity Requires Turnaround
- Other Work Scope Requiring Turnaround
- Capital Projects / Improvements
1.1.2 Typical Turnaround Scope Items
- Malfunctioning Equipment
- Any equipment that will be at or near failure at the time of the turnaround
- Equipment needing repairs that cannot be performed online
- Leaking valves
- Inoperable valves
- PSV’s due for inspection
- Equipment due for inspection
- Equipment needing to be cleaned due to fouling
- Any containment items such as clamps
- VOC leaks
- Regulatory Compliance Items
Preliminary Work List
The development of the preliminary work list is the first stage in the scope development life cycle. It starts by collecting all known turnaround related items; these will come in the form of different lists from different parts of the organization. For example:
- Any items required to meet business objectives in the turnaround premise document
- Capital Project items
- Regulatory compliance items
- CMMS backlog
- Reliability items required to meet the units desired run cycle Repairs that require turnaround to execute
- PM’s
- Piping Tie-Ins
- VOC Emissions
Once the lists have been collected, they need to be consolidated in the turnaround work log. The work log could be in the form of an Excel document or a computerized planning database. The work log should contain the appropriate amount of information to effectively manage the scope.
Sample fields to include in the work log:
With the different scope lists consolidated, there should be scope development meetings to review each item individually to ensure all needed information has been identified. It’s recommended to obtain a copy of the latest version of the P&ID’s and mark up each item as they are reviewed to prevent duplicating scope items. Often, different operators or maintenance personnel enter the same items in the CMMS software with different descriptions. By marking the scope items up on the P&ID’s, it prevents planning duplicate work, thus saving you time and money.
1.1.3 Risk-Based Work Selection
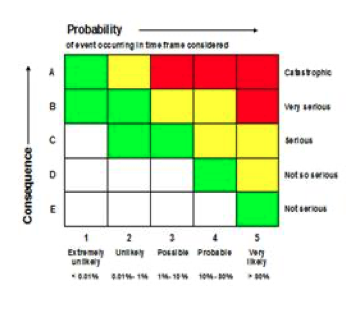
Scope is developed utilizing a risk matrix to identify the probability and consequence of doing, or not doing, a specific item in relation to the turnaround’s business objectives. The matrix is made
up of a 5 X 5 scale with the horizontal axis representing the probability and the vertical axis representing the consequence. The probability ranges from 1 thru 5, with 1 representing the least likely to occur and 5 being the most likely to occur. The consequence ranges from A through E, with A being the most severe and E being the least severe.
Sample Risk Matrix
Sample Consequences
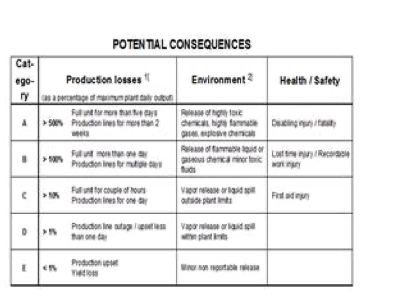
Utilizing (RBWS) Risk Based Work Selection provides a foundation for the organization to make decisions on whether a particular scope item should be included in the turnaround’s scope. Utilizing this process will help eliminate unnecessary scope items that could impact your overall budget and duration.
1.1.4 Scope Challenge
When the preliminary work list is complete, there needs to be a scope challenge session. This session is where we determine whether an item meets the requirements to be turnaround scope. Each scope item must meet at least one of the turnaround’s business objectives, and determined if the scope can be performed online or if it requires the unit to be down (offline) to execute. You want to avoid as much of the opportunity work as you can, as this impacts the overall budget.

1.1.5 Freeze Scope
The amount of time that scope is frozen prior to execution could vary based on the size and complexity of the turnaround. The date should allow sufficient time for detailed planning, scheduling, and budget development. Freezing the scope initiates the change management process; from that point on, any item being added or removed must go through the change management process.

Jun 15, 2020 | Documentation
This paper provides key insights into the changes that have occurred in Primavera P6 with the transition of the product into a web-centric environment and with the introduction of Primavera P6 Release 8.x.
After Primavera was acquired by Oracle in January 2009, Primavera P6 was eventually ‘assimilated’ into the Oracle Red StackTM solution (all Oracle products suite) with the release of P6 8.0. Prior to the release of P6 R8.0, there was one flavor of a Primavera P6 database (PMDB aka Project Management Database) to administer (not including Methodology Manager aka MMDB), and if the P6 Web was required to run alongside of the P6 Professional Client, it was just a matter of installing a web application server and attaching it to the same database that the P6 Professional Client was attached.
When P6 R8.0 was released around Oct. 2010, it introduced the concept of the ‘Optional Client’ which had to be connected to a P6 R8.0 database and forced all administration to be relegated to the P6 Web interface. This caused a large Primavera community backlash concerning the lack of administration capability in an ‘optional’ client and in part caused the subsequent release of P6 R8.1 and the introduction of the Professional Project management (PPM) and Enterprise Project Portfolio Management (EPPM) databases.
Primavera P6 can now be purchased in two distinct flavors; P6 Professional (PPM) and P6 Enterprise (EPPM). P6 PPM is also known as the ‘standalone’ application but there seems to be confusion over whether it can also be used in an EPPM environment. The answer is yes and no.
The P6 Professional Client application can be used in either environment regardless if it was bought with a PPM license or an EPPM license. The caveat is that when the client is connected to a PPM database the administration is accomplished from within the P6 Professional Client application just as it has for many years and versions prior to R8.x. But if the P6 Professional Client application is connected to a P6 EPPM database then a flag within the application can sense this connection and the administration capability transfers to the P6 Web interface.
Now this brings us to another issue that is not insurmountable but can be complex and time consuming. Let’s assume you have purchased several P6 licenses and went down the P6 PPM path. You’ve implemented P6 and have set up your structures in the database and are happily marching along with your project management and scheduling. Now a year or so down the road a new version of P6 is released (P6 R8.4 is slated to be released Fall 2014) and you want to upgrade. If you decide that all the P6 Web enhancements are something you may want to incorporate into your project controls you’ll have to implement an EPPM environment which will include a web application server. The primary issue is you’ve been running your projects in the PPM database and all the global data cannot be readily ported into the new EPPM database without some sort of mechanism to port the global structures (SDK, API, etc.) and exporting and importing all the P6 projects from one database to the other.
Key takeaways for administering and working in an EPPM environment are:
- All global information should ‘only’ be administered using the Web interface. Even though global codes, calendars, etc. can still be managed using the P6 Professional Client, issues can be encountered if two people are editing the same information at the same time using the two different interfaces.
- All resource capacity and allocation reporting and dashboards in P6 Web rely on summarized data. Failure to summarize on a daily or nightly basis could cause erroneous data to be reported.
- P6 Professional Client reports can only be viewed in the client. All P6 Web reporting now relies on BI Publisher. Workaround is to attach P6 Professional generated report to a project as a Document/Work Products.
- P6 Projects (not including Excel spreadsheet updates) can only be imported into P6 Web in P6 XML format. Unlike previous P6 versions though (where only one project at a time could be imported or exported), multiple projects can be exported/imported at the same time.
- Project templates created in P6 EPPM database cannot be viewed using the P6 Professional client.
- Risk Thresholds viewed and created in P6 Web are not the same as thresholds used in P6 Professional Client. Thresholds created in one interface cannot be seen in the other.
- Issue Forms created in P6 Web cannot be seen in P6 Client.
- Documents and Work Products associated with P6 Projects in P6 Web can be seen and alsomanaged in P6 Professional Client.
- P6 Web has the capability to import resources via Excel spreadsheet.
- P6 Web Activity Views (aka layouts in P6 Client) cannot be exported as layouts can in P6Client.
- Tracking Layouts are only available in P6 Professional Client.
- Job services that once were created and managed in P6 Professional Client are now createdand managed using P6 Web.
- P6 Users, EPS, OBS, Security Profiles are all managed in P6 EPPM database via the P6 Webinterface.