
Primavera P6 R8.x Administration in a PPM/EPPM World
This paper provides key insights into the changes that have occurred in Primavera P6 with the transition of the product into a web-centric environment and with the introduction of Primavera P6 Release 8.x.
After Primavera was acquired by Oracle in January 2009, Primavera P6 was eventually ‘assimilated’ into the Oracle Red StackTM solution (all Oracle products suite) with the release of P6 8.0. Prior to the release of P6 R8.0, there was one flavor of a Primavera P6 database (PMDB aka Project Management Database) to administer (not including Methodology Manager aka MMDB), and if the P6 Web was required to run alongside of the P6 Professional Client, it was just a matter of installing a web application server and attaching it to the same database that the P6 Professional Client was attached.
When P6 R8.0 was released around Oct. 2010, it introduced the concept of the ‘Optional Client’ which had to be connected to a P6 R8.0 database and forced all administration to be relegated to the P6 Web interface. This caused a large Primavera community backlash concerning the lack of administration capability in an ‘optional’ client and in part caused the subsequent release of P6 R8.1 and the introduction of the Professional Project management (PPM) and Enterprise Project Portfolio Management (EPPM) databases.
Primavera P6 can now be purchased in two distinct flavors; P6 Professional (PPM) and P6 Enterprise (EPPM). P6 PPM is also known as the ‘standalone’ application but there seems to be confusion over whether it can also be used in an EPPM environment. The answer is yes and no.
The P6 Professional Client application can be used in either environment regardless if it was bought with a PPM license or an EPPM license. The caveat is that when the client is connected to a PPM database the administration is accomplished from within the P6 Professional Client application just as it has for many years and versions prior to R8.x. But if the P6 Professional Client application is connected to a P6 EPPM database then a flag within the application can sense this connection and the administration capability transfers to the P6 Web interface.
Now this brings us to another issue that is not insurmountable but can be complex and time consuming. Let’s assume you have purchased several P6 licenses and went down the P6 PPM path. You’ve implemented P6 and have set up your structures in the database and are happily marching along with your project management and scheduling. Now a year or so down the road a new version of P6 is released (P6 R8.4 is slated to be released Fall 2014) and you want to upgrade. If you decide that all the P6 Web enhancements are something you may want to incorporate into your project controls you’ll have to implement an EPPM environment which will include a web application server. The primary issue is you’ve been running your projects in the PPM database and all the global data cannot be readily ported into the new EPPM database without some sort of mechanism to port the global structures (SDK, API, etc.) and exporting and importing all the P6 projects from one database to the other.
Key takeaways for administering and working in an EPPM environment are:
- All global information should ‘only’ be administered using the Web interface. Even though global codes, calendars, etc. can still be managed using the P6 Professional Client, issues can be encountered if two people are editing the same information at the same time using the two different interfaces.
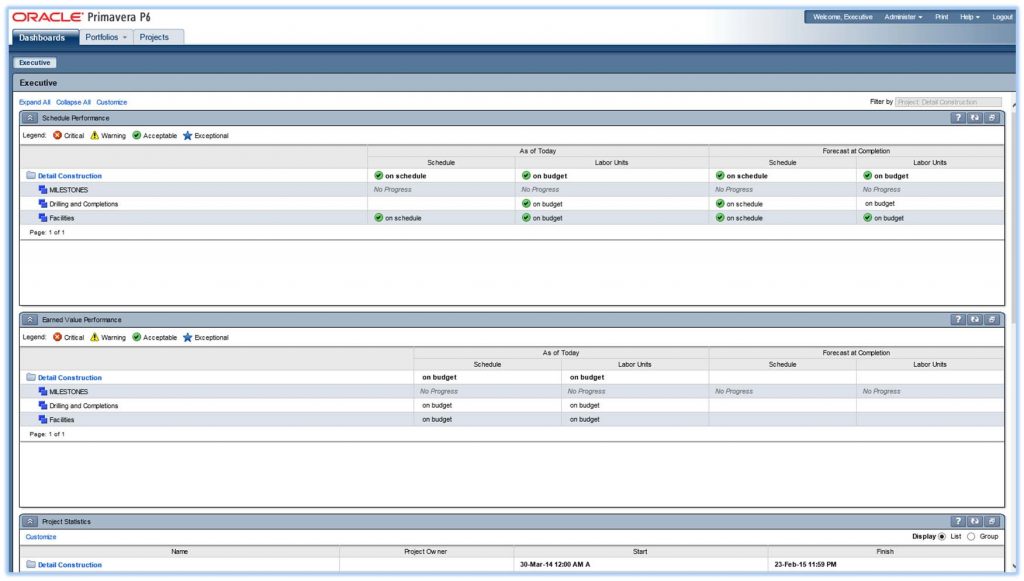
- All resource capacity and allocation reporting and dashboards in P6 Web rely on summarized data. Failure to summarize on a daily or nightly basis could cause erroneous data to be reported.
- P6 Professional Client reports can only be viewed in the client. All P6 Web reporting now relies on BI Publisher. Workaround is to attach P6 Professional generated report to a project as a Document/Work Products.
- P6 Projects (not including Excel spreadsheet updates) can only be imported into P6 Web in P6 XML format. Unlike previous P6 versions though (where only one project at a time could be imported or exported), multiple projects can be exported/imported at the same time.
- Project templates created in P6 EPPM database cannot be viewed using the P6 Professional client.
- Risk Thresholds viewed and created in P6 Web are not the same as thresholds used in P6 Professional Client. Thresholds created in one interface cannot be seen in the other.
- Issue Forms created in P6 Web cannot be seen in P6 Client.
- Documents and Work Products associated with P6 Projects in P6 Web can be seen and alsomanaged in P6 Professional Client.
- P6 Web has the capability to import resources via Excel spreadsheet.
- P6 Web Activity Views (aka layouts in P6 Client) cannot be exported as layouts can in P6Client.
- Tracking Layouts are only available in P6 Professional Client.
- Job services that once were created and managed in P6 Professional Client are now createdand managed using P6 Web.
- P6 Users, EPS, OBS, Security Profiles are all managed in P6 EPPM database via the P6 Webinterface.


 button in the toolbar.

 to select a new file.


 symbols to move the users.